Showing posts with label Food and Wine. Show all posts

Tuesday, July 27, 2010

Test Kitchen: Zucchini Carpaccio with Salt-Broiled Shrimp

This month’s Test Kitchen featured recipes from Food and Wine magazine’s best new chefs of 2010. It was a close race among the recipes, but the winner with 35 percent of the votes was the Zucchini Carpaccio recipe from Chef Jason Stratton of Seattle’s Spinasse restaurant.

Stratton’s recipe barely beat out the Salmon with Cantaloupe (34 percent) from Chef John Shields of Town House in Virginia and local Best New Chef James Syhabout of Oakland’s Commis who offered up a Green Tomatoes recipe (29 percent).

Now, I’m always a bit wary using a recipe from a restaurant chef, mostly because they often involve many ingredients and a lot of steps. And while the Zucchini Carpaccio (with shrimp) sounds simple, it was quite cumbersome. Here’s how it went in my kitchen when I tried out the recipe. As always, you can get the full recipe on the Food and Wine website.

Most of the ingredients for the recipe were easy to find (although there were a lot of them), except for the main feature: large shrimp in shell. (BTW, I cut the recipe in half.) As you can see in the picture above of the final dish from the magazine, the shrimp was cooked with the head still on. So I had to find large shrimp with head on, and it’s not as easy as you might think. It’s not at your basic Safeway and even some of the gourmet-type shops. So you have to either go to Chinatown (and for added freshness buy the shrimp live) or a specialized fish shop. I luckily found them at the seafood stand at the farmers’ market at the Civic Center on Sunday.
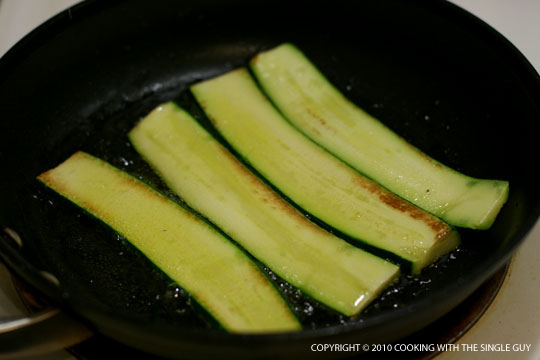
With my full shrimp in hand (I only paid about $3 for the six large shrimp), I started with the recipe, making the zucchini carpaccio first. I had to slice the zucchini lengthwise and then pan-fry them for a few minutes until they were slightly browned in a skillet.

After removing the zucchini strips from the pan, I then cooked the onion until they were soft and golden brown. Then I added the garlic and crushed red pepper and cooked it some more before adding the white wine and red wine vinegar. (See what I mean by a lot of ingredients.)

After adding the liquid, I had to wait until a third of it evaporated, or about 5 minutes.

When the onion mixture was cooked, I added the parsley AND mint.

Then the recipe said I had to layer the onion mixture with the zucchini strips in a shallow glass dish. I did as told, but I really have to say I didn’t understand the reason for doing this step. Maybe it was to marinate the zucchini strips with the onion mixture, but it’s not really explained. After creating almost what seems like a Napolean, I had to let the zucchini and onion mixture sit for at least an hour at room temperature. Again, for no other reason than that’s what the recipe said.

While the zucchini sat, I worked on the pine nut sauce. But you know what? The day I wanted to make this recipe, my grocery store didn’t have pine nuts! And I wasn’t about to go around town looking for a store with them, especially since they’re kind of expensive. So I went with sliced almond instead. This was my only substitution to the recipe. After toasting the nuts, I cooked them in a saucepan with chicken broth and lemon zest for more than 35 minutes waiting for the nuts to soften. When they were, I pulsed them into a puree, but the result was more of a peanut sauce rather than the creamy sauce promised by the recipe.

With the sauce done (this has already been more than a hour in the kitchen) I could finally cook my shrimp. I had to create a bed of coarse sea salt mixed with some lemon zest and crumpled bay leaves. I have to tell you, I hate using a whole bed of salt to cook seafood (which is why I will probably never do that salt-baked whole fish recipes you see sometimes) because it seems like such a waste of salt, and the bay leaves (but my bay leaves were old so I was willing to give them up).

Cooking the shrimp was pretty easy. After heating up the dish of salt under a broiler, I just placed the shrimp and cooked them under the broiler for about 3 minutes each side. Here’s how they looked after they came out of the kitchen. And then I plated everything up with the zucchini as a bed with the almond nut sauce and the shrimp on top. Here’s how the plate looked finish? What do you think?

My tips and warnings about this recipe:

  1. I really don’t get the whole layering of the zucchini strips and onion mixture. To me, you can probably just pile the onion mixture under and on top of the strips, but don’t worry about being so meticulous as to create almost a Napolean-style of layers.
  2. The nut sauce didn’t turn out creamy or white looking like in the photo. In the photo the sauce looks almost like yogurt. So I actually might add some yogurt and maybe less of the chicken broth.
Ease of cooking: Oh, you know what I’m going to say. This was not easy. Doing the steps on their own was simple, but combined together this was a lot of work resulting in a dish that in my mind would be a nice appetizer and not necessarily a main dish.

Taste: The shrimp was perfect, albeit a bit difficult to eat with the shell and everything. But it’s hard to spoil the shrimp if you cook it right and not over or under cook it. And actually, the zucchini wasn’t that bad with the onion mixture because of the bright mint in the mixture along with the twist of red wine vinegar. The recipe turns out a lot of the mixture and in the end I threw out almost half of what I made. What I found weird about this dish was you had to eat the shrimp with your fingers because you have to peel the shell, but then you have the zucchini, which you probably need a fork to eat. I don’t like dishes that don’t make sense that way.

Overall grade: C+ because while it tasted OK, it was a lot of work for just an OK dish. Maybe it might taste better at the restaurant.

Don’t forget to vote for my next Test Kitchen poll in the upper right hand corner as I test recipes from Food and Wine’s August edition. And this may be my last Test Kitchen using Food and Wine because I’m letting my subscription run out. I’ve found their recipes don’t always taste as good as the pictures.

Previous test kitchens:
Ginger-Marinated Bulgogi
Espresso-Shortbread Brownie Bars
Basil-Crusted Leg of Lamb
Pork Tonkatsu

Tuesday, June 22, 2010

Test Kitchen: Ginger-Marinated Bulgogi-Style Chicken

This month’s Test Kitchen, where I test the recipes from Food and Wine magazine, gets me grilling with bulgogi.

Bulgogi is a traditional Korean dish of thinly sliced beef marinated in ginger and soy. It’s extremely popular at Korean BBQ restaurants, where you cook the meat at your table, but in Food and Wine’s version they use chicken, which sounds a lot healthier.

The recipe is from Nick Fauchald, editor at TastingTable.com (the same people who flood my email everyday with tasting finds). Fauchald laments about eating out five nights a week (again, how can I get his job?) so he offered up some healthy recipes he makes at home to support his tri-athlete body.

More than 39 percent of you voted for this recipe, which I admit is pretty simple but I wanted to see if Food and Wine could get Asian right. (Others voted for the Thai turkey burger, 32 percent, and salt and pepper squid, 27 percent.)

As always, you can get the full recipe on the Food and Wine website. But here’s what happened in my kitchen.

I started by making the marinade. The tricky thing about the recipe is it specifically says you need to marinate the chicken for at least two hours but not more than four. For me, I always marinate chicken in the morning, then go to work, and then make dinner when I come home 10 hours later. But apparently that’s too much marinating time, so this recipe makes it difficult for this to be an easy weeknight dinner. You have to do it on the weekend when you won’t be gone all day.

The marinade has all the classic Korean ingredients of lots of garlic (three cloves!) and lots of ginger, along with shoyu (Fauchald specifies light soy), rice vinegar (unseasoned), toasted sesame oil, toasted sesame seeds and thinly sliced scallions. Everything is sweetened with a bit of honey. (I sometimes use sugar for more sweetness.)

After I blended all my ingredients together, I poured it into a plastic zip-lock bag and added my chicken. Here’s where I cheated: The recipe says to buy chicken breast and pound them until they’re 1/4-inch thick. That always makes such a raucous in the kitchen (not to mention the extra labor), so I just bought the thinly sliced chicken breast they now sell sometimes at the grocery store. (If you can’t find thinly sliced chicken breast, you can do the pounding or butterfly the chicken so they’re thin.)

I placed the chicken in the refrigerator and waited two hours.

When I was ready to cook, I sprayed my grill pan with some vegetable oil. I don’t have a grill even though this recipe was designed for outdoor grilling. But if you’re like me, a grill pan will work just as well (you just may need to cook your chicken in batches if your pan is small like mine).

Because the breast slices are thin, it doesn’t take that long to cook. For me, it was about 2 to 3 minutes on each side. When you cook the first side, you want to resist flipping it until it’s ready so you can have the nice grill mark.

The recipe suggests serving the sliced bulgogi chicken with lettuce, rice, cucumber and kim chi. I found everything except the kim chi at my store, so I had to go without it even though that’s a classic Korean condiment. I did this on the weekend and didn’t feel like catching the bus to my Korean grocer just for kim chi. So my dish, pictured below, doesn’t look exactly like the one from the magazine, pictured above, but close enough, right?

My tips and warnings about this recipe:

  1. I already went over the whole issue about the timing of the marinade in the refrigerator. It’s a two to four hour window. In reality, that’s a good rule because the salt from the shoyu tends to tighten the chicken meat if left too long sitting in sodium. So avoiding a long marinating period probably keeps your chicken from getting that “cured” texture.
  2. The toasted sesame seeds added at the end is actually a nice touch and I wouldn’t skip this step.
  3. The sliced cucumbers add a nice, cooling taste to the dish. But for fun, you can also pickle them Korean-style like this to add another dimension to this Korean meal.
Ease of cooking: I mean, come on. This is so simple. It’s probably preparing the side dishes that make it complicated. The chicken itself is super easy. Marinade. Grill. Eat.

Taste: The marinade had all the classic flavors of Asian marinades so this turned out quite well in my eyes. Everything was well balanced, and definitely big on the garlic flavor, but it’s not Korean without the garlic! (In the past, I’ve experimented with this dish by adding Korean hot paste, which just gives it an extra kick.)

Overall grade: A- because the taste is pretty authentic and it’s simple to make but I don’t like the idea of pounding the chicken so I took points off for that and for all the other side requirements. It’s not anything surprising, but simply a classic.

Don’t forget to vote in my next Test Kitchen poll on the upper right hand corner. The July edition of Food and Wine is the annual “Best New Chefs” issue, so I picked three recipes from three of the best new chefs. I don’t say who the recipes are from, so you’ll have to wait to find out once you choose the winning recipe.

Previous test kitchens:
Espresso-Shortbread Brownie Bars
Basil-Crusted Leg of Lamb
Pork Tonkatsu
Winter Vegetable Chili

Wednesday, June 02, 2010

Test Kitchen: Espresso-Shortbread Brownie Bars

My apologies that I’m a bit late with my monthly Test Kitchen since last month I was away in Chicago. But I’m excited because for May I’m testing a dessert for the first time!

I admit I may have skewed last month’s poll toward these espresso-shortbread brownie bars by offering up two boring alternatives. More than 42 percent of you voted for the brownies, closely followed by the smoky paella (41 percent) and far in the distance was poor curried cauliflower green bean salad (16 percent).

This recipe is from Food and Wine Magazine’s senior recipe developer (how can I get her job?) Grace Parisi, and like most of the magazine’s recipes it promised to be simple and easy. Let’s see how it all went down in my kitchen. (As always, you can get the full recipe at the magazine’s website.)

This brownie is taken up a notch by adding an espresso shortbread as the base. So I started off by making the shortbread. First I got some espresso beans from my local Peet’s Coffee. Thankfully, the bean people are pretty nice about letting you buy as much or as little of the beans that you want. And since I’m not a coffee drinker, I really only needed half a cup, which is what I bought.

I got home and grounded 1 tablespoons of the espresso beans in my spice grinder. Then I was ready to assemble the shortbread ingredients of butter, flour and sugar. Again, I ran into the problem of not reading the recipe before putting it up for the poll because it said I should pulse the ingredients in a food processor, which I don’t have. So I improvised and just used my hand mixer and turned it on and off, imitating the pulsating action of the food processor. Hey, a guy’s got to do what a guy’s got to do.

I then pressed the shortbread dough onto a pan. Again, the recipe called for a 9X13 inch pan and I had an 8X12 inch pan. So you know what I did? I just used enough dough to make a thin layer and just tossed out the rest. (It was only a little bit leftover.) In the end, because the dough had the espresso beans, the color looked odd and reminded me of cardboard. Not very appetizing. Here’s how it looked after I baked it for about 30 minutes until golden brown (or as golden as cardboard can get).

Then I worked on the brownie batter. So you guessed it, I didn’t really read the recipe carefully and it says to use unsweetened chocolate and I only had semi-sweet. So I was worried my brownies would be too sweet, which I hate. I improvised again and to compensate for the sugar in the chocolate, I only put 1¼ cup of sugar when the recipe called for 2 cups. I poured my batter over the crust and then placed it in the oven to bake for another 30 minutes.


So that was it! Pretty easy steps. After taking it out of the oven, I let it cool and then cut it up into little squares. Here’s hot they turned out. Food and Wine Magazine didn’t have a photo of the brownies in its magazine, so there’s no shot for comparison. I’m just going to have to imagine that my brownie turned out how it should be.

My tips and warnings about this recipe:

  1. The brownie batter turns out to be like chocolate cake, but I like my brownie a bit more gooey. So next time I might do the trick of mixing in chunks of chocolate that will then turn to ooze when baked (instead of melting all the chocolate ahead of time).
  2. The brownies actually didn’t taste too sweet. In fact, I think they were under-sweetened. So maybe you might want to use semi-sweet chocolate with the full 2 cups of sugar and not unsweetened chocolate.
  3. The recipe says you can make these ahead and keep them in an air-tight container for five days. I really doubt that. After a day, they started to lose color (looking like blondies instead of brownies) even though I had them in a plastic container. I think they’re good for maybe 2 or 3 days, max.
Ease of cooking: Another really simple recipe that didn’t take too long to prepare. The only part that was hard for me was the shortbread, and only because I didn’t have a food processor. Otherwise, really easy.

Taste: Like I briefly mentioned above, they didn’t taste as sweet for a brownie. Also, the batter was more cake like. The shortbread was an odd addition, giving the brownie a tough edge to it. I definitely tasted the espresso flavor in the cookie portion, but I don’t know if it added or detracted to the brownie. It was just different.

Overall grade: C+ because even though it was easy to make, I don’t think the brownie portion of it was that outstanding. It really tasted average. I brought a bunch to my office and people didn’t rave over them, mostly because I think it wasn’t as sweet and didn’t have a texture of brownies as much as cake.

Don’t forget to vote in my poll on the upper right column. It’s the grilling season and Food and Wine’s June edition has lots of grilling recipes, which sucks for me because I don’t have a grill or backyard. So I had to look for non-grilling recipes to test.

Previous test kitchens:
Basil-Crusted Leg of Lamb
Pork Tonkatsu
Winter Vegetable Chili
Penne Rigate with Spicy Braised Swordfish

Tuesday, April 27, 2010

Test Kitchen: Basil Crusted Leg of Lamb

This month’s Test Kitchen is a promise of Brazil and Provence — two very exotic food destinations. And the recipe, from the April edition of Food and Wine magazine, is courtesy of Daniel Boulud, the famous New York chef.

Chef Boulud’s Leg of Lamb with Lemon Vinaigrette recipe beat out other choices in this month’s poll. 41 percent of you went for the lamb, which I admit is a great choice for spring, over marinated sardines (30 percent) by Chef Mario Batali and mussels with piquillo rouille (27 percent) by Bay Area’s own Chef Chris Kronner. (Maybe I should have based the poll on the names of the chefs and then it would have been a popularity contest?)

I admit the photo of the lamb in the magazine (pictured to the right) looked especially enticing. So it was going to be a challenge to duplicate it.

What I also realized is that chef’s recipes (not surprisingly) are a lot of steps and work and equipment. And I should have read the recipe more clearly before putting it up for the poll because Chef Boulud’s lamb recipe required a lot of equipment I didn’t have (namely a food processor and a flame-proof roasting pan). But because I always follow through with my promises, I powered through and the following is how it all went down in my kitchen.

Just a reminder, as the Single Guy, I wasn’t about to cook a 5-lb. leg of lamb for myself. So I cut the recipe in half. As always, you can get the full recipe at the Food and Wine Web site.

I started off by toasting some pine nuts in my oven. Why are pine nuts so expensive? Luckily, I bought it at the bulk section of Whole Foods so I only got the small amount I needed instead of a whole bag.

Next I had to prep the basil leaves, blanching them first and then pulverizing them in a food processor. Like I said, I don’t own a food processor but I remembered that I had a food chopper attachment for my hand blender. So that’s what I used to create a puree with the basil and olive oil. (It might not be as smooth as it was supposed to be, but I think it does the trick.)

The basil puree now needed some toast and pine nuts. (Also, the recipe said to add a clove of garlic and lemon zest but I have to admit I forgot the lemon zest.) For the toast, Boulud specifically calls for three slices of packaged white bread. Since I was doing just half the recipe, it meant I only needed 1½ slices of white bread. I don’t eat white bread, and I wasn’t about to buy a whole loaf just to use 1½ slices. So I just used the whole grain bread I typically buy and used a slice of that. I’m sure the white bread was more for aesthetics because it’s white and will show up better than the brown whole grain bread.


After pulsating the ingredients, I spread the puree onto my flat leg of lamb. The recipe calls for a boneless leg of lamb, and the one I got was about 2 pounds. So more a stub than a leg.

Then you’re supposed to tie up the lamb with kitchen string. I’ve found that the only reason for doing this when cooking any leg or loin is to just keep the nice round shape of the piece of meat instead of it looking flat and spread out. Here’s my handiwork with the tying. (I didn’t have to tie it that many times since the lamb was such a short leg.)

Now the recipe called for browning the leg of lamb in a flame-proof roasting pan, which I don’t have. These are the type of roasting pans you can place on top of your stove and cook with. I think it works best with a gas stovetop but I have an electric stove. So I improvised by browning the leg of lamb in a large pan and then transferring it to my aluminum foil-lined cheapy roasting pan.

I was supposed to cook the lamb for 1.5 hours, but I thought since it was just half the size of what the recipe called for, it might not take as long to cook. So after 45 minutes, I checked the temperature using my instant-read thermometer and it was at the 130 degrees for medium rare. Then I was supposed to cut off the strings, and when I did, the lamb fell apart and unfolded, showing the inside parts were still pink. Ugh, so I had to push it back into somewhat shape (no way to re-tie it when it was so hot) and shoved it back into the oven.

After another 30 minutes, I was pretty sure it was done, and then I spread the remaining basil puree to create the crust on the top. Then I set the lamb under the broiler for five minutes like the recipe said. Then I was supposed to take it out and let it sit for 20 minutes before cutting into it. When I serve it, I was supposed to create the lemon vinaigrette using lemon juice, Dijon mustard and olive oil.

But what the recipe didn’t say was to sprinkle a whole bunch of bread crumbs on the top of the leg of lamb, and I’m pretty sure that’s what the Food and Wine editors did because if you look at the picture above, no way was that lamb simply encrusted with the basil puree, right?

So I got some croutons that I had leftover from a salad, and I just broke them up into little pieces and topped my cooked leg of lamb with it. The result is pictured below. Again, my photo is at a disadvantage because it doesn’t depict a whole leg of lamb, so it might look stunted. But what do you think?

My tips and warnings about this recipe:

  1. Like I said earlier, you probably want to sprinkle some bread crumbs (with maybe some chopped pine nuts) on top of your leg of lamb before serving, just for better presentation.
  2. Swapping out the white bread with my whole grain bread didn’t seem to make a difference, I think, because you hardly could taste the bread in the puree.
  3. Lamb lets off a lot of oil when cooking, so you might want to use a splatter guard when you’re browning it on your stovetop before placing it inside the oven.

Ease of cooking: The recipe was easy to follow, but it felt like a lot of work — from roasting the pine nuts to pulsating the basil to tying up the lamb and then searing it on the stovetop. And I sure had a lot of things to wash in my sink after I was done cooking.

Taste: I don’t know if I’ve made leg of lamb before (I’ve made lamb meatballs and lamb chops), but this part of the animal is so tasty and tender! My lamb came out very soft. Not sure if it was where I got it or if all leg of lambs are tender, but it was tasty. As for the recipe, I realized while eating that the basil puree really just sounded like pesto. So I wondered why he didn’t call this a pesto-encrusted leg of lamb? The basil flavor, though, was really subtle after being pureed and cooked in the oven. So I’m not sure how much it added to the overall lamb-eating experience. The lemon vinaigrette you drizzle at the end is a nice, fancy, cheffy thing to do and did add a nice zing.

Overall grade: B- because it was a lot of work and created a lot of dirty dishes and overall I didn’t feel the basil came through. But I love eating lamb and this seemed like a fool-proof recipe.

Don’t forget to vote in the poll on the upper right-hand column to let me know which recipe I should test from the pages of the May edition of Food and Wine.

Previous test kitchens:
Pork Tonkatsu
Winter Vegetable Chili
Penne Rigate with Spicy Braised Swordfish
Five-spice Glazed Sweet Potatoes and Walnut Toffee

Sunday, March 28, 2010

Test Kitchen: Pork Tonkatsu

I knew putting together the poll for this month’s Test Kitchen (where I test the recipes from the pages of Food and Wine magazine) that the pork tonkatsu recipe would win (40%). I mean, fried breaded pork cutlets? I knew you guys would force me to make something fried.

Well, I put it out there as an option because this was supposedly a healthy version of pork tonkatsu. I was also interested in this recipe because it reminds me a lot of growing up in Hawaii.

Pork tonkatsu is one of the popular plate lunch entrées (others are teriyaki beef and kalua pig). I’ve eaten pork tonkatsu before, and enjoyed it, but I limited it when I was growing up because I knew it was deep-fried. And when I left Hawaii, I ate pork tonkatsu (offered at many Japanese restaurants) as often as I ate fried chicken.

You can get the full recipe from the Food and Wine Web site here. And here’s how it went in my kitchen.

First off, you make the sauce that goes with pork tonkatsu. I have to say, even though I don’t eat a lot of pork tonkatsu, I loooove the sauce that comes with the dish. It’s like a cross between ketchup and A1 steak sauce. I like it so much that I even have a bottle of the stuff in my frig that I got from a Japanese grocery store. I use it when I make pork chops.

But since I’m testing the recipe, I started out putting all the ingredients in a small saucepan: ketchup (told you), apple butter (my first time using this stuff), Worcestershire sauce, soy sauce, Dijon mustard, and rice vinegar.

You just warm it up and blend everything together. The recipe didn’t say for how long, but since none of the ingredients are raw, I just cooked it long enough so everything could blend together. This is how it looked – a bit lighter than the sauce I typically see.

The pork needed to be pounded into 1/2-inch thickness. But I was too lazy for that, so I just bought the thin-sliced boneless pork pieces at my local Safeway.

Then the pork cutlets are pan-fried with a bit of oil in a pan. The dredging technique is pretty basic: start with dipping in flour, then egg whites, and finally the Japanese bread crumbs known as panko (which isn’t actually made from bread but works the same way).

Unfortunately, I followed the instructions for browning and for some reason the panko didn’t seem to brown evenly, probably because it was not immersed in hot oil. So the pork tonkatsu looked a bit sickly in a weird white-and-brown spotted way.

When I was doing frying up my pork tonkatsu, I served it up with some steamed rice and sautéed asparagus since that’s in season (the recipe says spinach but I’m sure you can use any greens).

So here’s how it turned out. Yep, it doesn’t look like how I remembered pork tonkatsu in Hawaii.

My tips and warnings about this recipe:

  1. I think 1/4-inch thickness is better than 1/2-inch. The thinner the pork, the quicker it’ll cook and less time sitting in oil.
  2. Even though I don’t like submerging food in oil, if you want golden brown, you’re going to have to use more than the amount I used, which was about two tablespoons but now I see the recipe called for 1/4 cup canola oil. Not sure if that will make a difference.
  3. Use less apple butter to avoid your tonkatsu sauce tasting like apple sauce.
Ease of cooking: This is super easy because you just mix together the sauce and for the pork it’s just dredging and frying. It’s really simple, but a bit messy, which is another reason why I don’t fry foods that often having to create that dredging station of three plates which each dipping ingredient.

Taste: The pork with its pale panko crust was tasteless. This even after I seasoned the pork with some salt. I guess the taste is supposed to be helped by the sauce, but my sauce tasted mostly like apple sauce and wasn’t as silky and thick like the store-bought version I had already (and ended up using to finish off my pork).

Overall grade: D- because it wasn’t very tasty, not a fan of the sauce and it wasn’t golden brown. (I would have given the recipe an F but then realize it was partly my fault for not adding enough oil to pan fry this thing.)

Don’t forget to vote in the poll on the upper right-hand column to let me know which recipe I should test from the pages of the April edition of Food and Wine.

Previous test kitchens:
Winter Vegetable Chili
Penne Rigate with Spicy Braised Swordfish
Five-spice Glazed Sweet Potatoes and Walnut Toffee
Smoky Shrimp and Chorizo Soup

Wednesday, February 24, 2010

Test Kitchen: Winter Vegetable Chili Recipe

I have to thank you readers for thinking so much about my health. I mean, how else can I explain the last two selections for my Test Kitchen project, where I cook recipes from the pages of Food and Wine magazine?

Last month you all told me to try a healthy braised swordfish recipe and this month’s winning selection (with 49 percent of the votes) is a vegetarian chili — and I’m not even vegetarian! (I would have easily gone for the maple-chipotle hot wings, with 27 percent, or the Sichuan shrimp with mung noodles, with 23 percent.)

But you’re the boss, so off I went with my shopping list and since this was vegetarian I was able to get most of the fresh ingredients from my farmers market. As always, you can get the complete recipe from Food and Wine’s Web site here.

Here’s how it went when I started cooking in my kitchen:

I started off by prepping the vegetables, which were the stars of this chili. The main vegetables were red bell pepper, parsnips and carrots — all at their peak this season. (Well, except the bell pepper, which you can get all the time.) Other things going into the chili came mostly from the can, including hominy and peeled Italian tomatoes.

In my Dutch oven, I started off by sweating the onions and garlic and then added in the three main vegetables. After they browned a bit, I added in the chili powder and ground cumin (the heat allows the spices to release their flavors). This is also a good time to season the vegetables with some salt.

The recipe said to blend the canned chipotle and the Italian tomatoes into a puree. Because I don’t have a blender, I just dumped everything into a pot and used my handy hand-blender that I use to puree soup. Now, here’s where I have a confession (or more like a complaint against the copy of the Food and Wine recipe). The recipe calls for “1 canned chipotle in adobo, plus 1 tablespoon adobo sauce.”

I’ve never used canned chipotle, but was able to find it in the Mexican aisle of my grocery store. Well, in the ingredient list the chipotle was listed after “One 14-ounce can peeled Italian tomatoes.” So in my mind I was thinking “can” and didn’t realize the recipe said “canned” as an adjective and not an object. (Oooh, the editor comes out to play!)

So basically I dumped the entire can of chipotle and the sauce in with the tomatoes. The can was one of those small cans, I think maybe 6 ounces or something like that.

I dumped the puree into the pot along with the hominy and some water. The recipe also says to throw in the kidney beans at this time, but I don’t like to have super soft beans since I just use canned kidney beans, so I added this near the end. I let the pot of chili cook for 20 minutes like the recipe said until the vegetables were tender.

When the chili is done, you can taste it to add more seasoning if needed. But if some of you are familiar with using canned chipotle peppers, then you know that my chili turned out to be a four-alarm fire-hot chili, so even tasting it to see if it needed seasoning was traumatic for me.

Needless to say, I spent the night sweating as I ate just half a bowl of chili, and I cursed Food and Wine for putting on a recipe that was so fiery hot without a warning.

Then a few days later, I checked the recipe again, my mouth still burning mad, and read carefully that I really only needed to add one chipotle pepper from the can and not the entire can. ARGH!!%A@$!!@!

Anywho, here’s how my chili turned out. It looks so harmless in a photo when you can’t taste it. The recipe says to serve it with red onions, sour cream, cilantro and chips. Again, I hate it when they tell you to use so many garnishes. I skipped the red onions because I’m not such a fan of onions, and also the sour cream because of my cholesterol. I ate the chili with sweetened iced tea, which really helped a lot.

My tips and warnings about this recipe:

  1. Read the ingredient list carefully. When they say “canned chipotle” they mean one chipotle from a can, not one entire can. If you like your chili super spicy, then you can add more heat by either adding another chipotle pepper or using more of the adobo sauce from the can.
  2. If you use canned beans like I did, you might want to add them to the pot about 10 minutes before the vegetables are ready so that you don’t have really mushy beans.
  3. This really is a nice base for regular chili with meat, so you can add the ground beef or pork after you sweat the onions and before you add the vegetables.
  4. Read the ingredient list carefully. They really should have written it as “1 chipotle pepper in adobo sauce from the can, with 1 tablespoon of sauce.”
Ease of cooking: Other than the prepping of the vegetables and pureeing the tomatoes and chipotle, making chili is super easy since all you really do is sauté your ingredients and then let them simmer together to blend all their flavors together. The steps are fairly simple to follow along and you end up making a nice pot of chili that you can use for lunch and dinner for a few days during the week.

Taste: After I realized my error in reading the poorly written Food and Wine recipe, I made a second pot of the chili. (I ended up using some leftover ground lamb I had in my freezer just because I wanted to use it up.) The overall taste of the chili was better, and not as traumatically hot. In fact, it almost tasted bland. In the end, I did like the vegetable base of this recipe and it was really simple, and the flavors tasted better (like most chili and stews) after it sat in the refrigerator for a day.

Overall Grade: C (I originally was going to give it an F because of the intense heat, but since I was partly to blame for not reading the recipe carefully, I upgraded it because it is simple and tasted OK. Still, I wished the recipe had a section on adjusting the heat to your taste and that it was better written! Points off for that!)

Don’t forget to vote in the poll on the upper right hand column to see which recipe I should be testing next from the March edition of Food and Wine. By then I think my tongue should have healed and I should have my taste buds back!

Previous test kitchens:
Penne Rigate with Spicy Braised Swordfish
Five-spice Glazed Sweet Potatoes and Walnut Toffee
Smoky Shrimp and Chorizo Soup
Rabbit Ragout with Soppressata and Pappardelle